

IN MY EARLIER article in this issue (pages 985-986), I shared some lessons I learned during my first year of seriously growing orchids. Many of those lessons come from growing cattleyas indoors, under LED lights, in grow-tents. I promised to explain that setup in more detail. This is me fulfilling that promise.
A grow-tent can be a terrific option for growers who want more control than a windowsill provides but do not have the space, budget or domestic negotiating leverage for a greenhouse. Tents can provide bright light, stable temperatures and good humidity in a relatively small footprint. On the flip side, they can also turn a spare room into a swamp if you do not plan carefully.
I have had both kinds of tents: the kind that grows thriving orchids and the kind that creates new household maintenance projects. Here is what I wish I knew at the beginning of my grow tent journey.
A TENT IS A SYSTEM, NOT A MAGIC BOX My first mistake was thinking mostly about the tent itself: How big is it? How many plants can I cram into it? Where can I put the lights? Those questions matter, but a tent is really a small managed ecosystem. Light affects heat. Heat and airflow affect how quickly pots dry. Watering affects humidity. And so on. Every decision eventually influences another decision.
[1] A grow tent is a managed microclimate: light, temperature, humidity, airflow and drainage must work together.
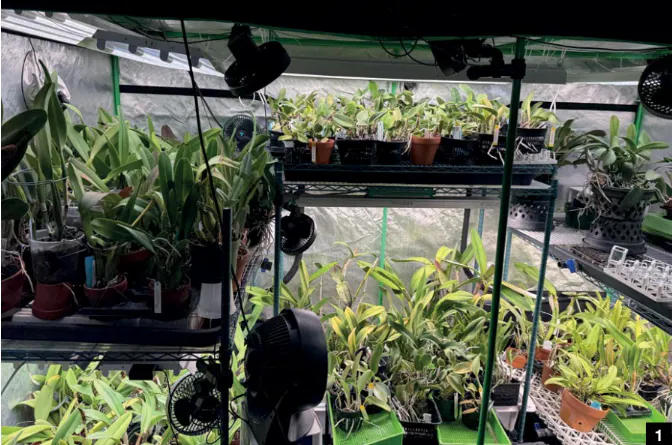
Before buying equipment, write down what you want to grow and what those plants need. A tent can create a useful range of conditions, but it cannot realistically be Miami, Medellín and the Andes at the same time. I eventually stopped trying to grow every orchid that caught my eye and designed my space around cattleyas. With that focus on a single genus, my plants became happier, and so did I.
START WITH THE PART NOBODY PUTS ON INSTAGRAM Blooms are exciting. Flood trays are not. Nevertheless, the best grow-tent plans start with drainage. Before the first plant enters the tent, decide where water will go, how you will remove it, and what happens when, not if, something leaks. If you have a small collection and decide to manually pull your plants out of the tent to water them elsewhere, drainage likely will not be an issue for you.
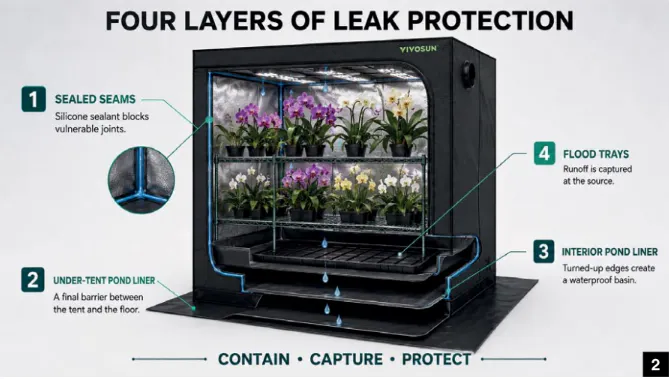
My current setup uses several layers of water protection. When I get a new tent, I use Flex-Seal silicone spray to seal all the tent seams. Even the best tents do not have fully waterproof seams, so do not skip this step. Just make sure to spray outside and wear proper personal protective equipment, because the fumes are toxic.
Next, a pond liner sits underneath the tent (above my tile floor), and another pond liner forms a basin inside the tent. In addition, each shelf has an opaque plastic liner, a 5-inch-deep (12.5 cm) flood tray (from Active Aqua) to capture runoff, and an epoxy-coated wire shelf above the flood tray. The plants sit on the shelf above the water, instead of soaking in yesterday’s fertilizer soup and becoming the tropical equivalent of Typhoid Mary. I have included a list of my go-to equipment in the article.
All this focus on water management may sound excessive to my friends in Florida who grow orchids outside year-round. I promise, it is not excessive if the tent is sitting on a floor you would like to keep. Water finds seams, pinholes and low spots with an almost admirable sense of purpose. Redundancy buys time when a tray overflows or a fitting fails.
When it is time to empty the flood trays (they can hold 8+ gallons (30.3 liters of water each), I use a small transfer pump from FIDISP to transfer the water into 5-gallon (19 liter) buckets, which I dump down the drain. Some of my fellow indoor growers are fortunate to have floor drains where their tents are. Whatever method you choose, test it with plain water before adding plants, electricity and the priceless orchid you have been waiting three years to bloom.
[2] Four layers of leak protection contain water at the shelf, inside the tent and beneath the tent.
WATER AND ELECTRICITY: STILL NOT FRIENDS I work in the safety equipment industry, so I am legally and morally obligated to ruin the fun for one paragraph. Use GFCI-protected outlets around your tents. Keep plugs, controllers and power strips elevated and away from runoff. Finally, make sure your electrical service can safely handle the total load from all your equipment.
Do not assume every grow light is equally protected against moisture. I bought LED lights from a leading manufacturer and found out they were so poorly sealed that they nearly started a fire after a month of use due to water intrusion. Check any fixture’s rating; I recommend fixtures rated IP65 to provide good (if not perfect) protection against water. Even then, aim the sprayer at the plants, not the electrical system. If you are uncertain about the circuit or installation, ask a qualified electrician. Orchids are delightful; electrical fires are less so.
I have found the best lights come from Active Grow and VIVOSUN. In particular, Active Grow has even light distribution, low heat output, and, in my experience, is as close to waterproof as any light I have used. Although they are more expensive, for me they are worth the investment. I use their T5 High Output (HO) 2.0 lights in the Sun White Pro spectrum and have found them exceptionally reliable. When I need very high output lights for my Cattleya warscewiczii or Cattleya dowiana, VIVOSUN does an excellent job, provided I have at least 12 inches of space between the lights and the top of the foliage (due to higher heat output).
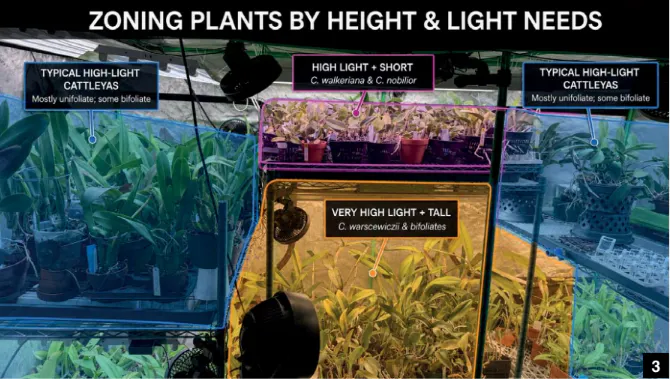
[3] Plant placement can create distinct growing zones based on both height and light requirements.
BRIGHT LIGHT IS NOT THE SAME AS EVEN LIGHT Cattleyas need substantial light to grow and flower well, but our eyes are terrible light meters. A shelf can look brilliantly illuminated while its corners receive much less light than its center. To manage my conditions, I use a light meter made by Dr. Meter designed for LEDs to check conditions at leaf level in multiple places — not just directly beneath the fixture. I am not an optical engineer, so I cannot explain the technical details, but not all light meters can accurately read LED lights. Make sure to buy a meter that is specifically built for LEDs.
I use two basic lighting approaches. For tall, very-high-light plants such as Cattleya warscewiczii and some bifoliates, I use a powerful fixture (a discontinued 400W fixture from VIVOSUN) farther above the foliage. For shorter plants such as Cattleya walkeriana and Cattleya nobilior, lower-heat linear LEDs from Active Grow are placed closer to the leaves. Typical high-light cattleyas occupy the surrounding shelves, using Active Grow lights.
An important lesson learned is grouping plants with similar needs and growth habits together. Measure several points across the growing area. Watch the plants for changes in leaf color and growth. Move an individual plant before redesigning the entire electrical grid because one cattleya has opinions.
[4] Several low-speed fans create overlapping air movement above, below and through the plants.
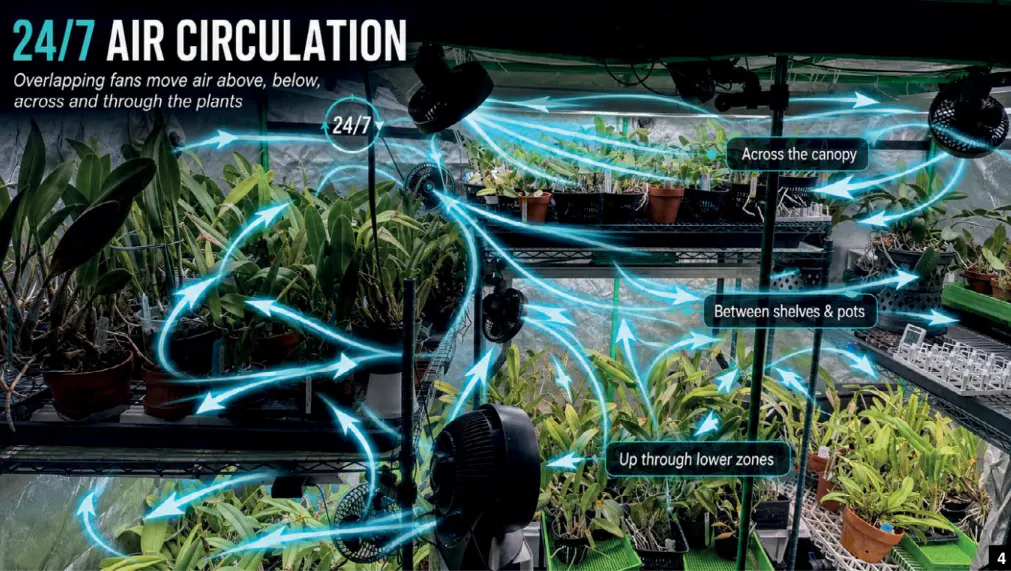
DO NOT CREATE A VERY SMALL, VERY HUMID CLOSET A densely packed tent develops stagnant pockets of air around leaves, roots and pots. I run several small fans at low speed 24 hours a day, positioned so their airflow overlaps above, below and through the plants. Leaves may move gently, but they should not look as though they are preparing for landfall of a Category 4 hurricane.
Air movement helps wet foliage and potting media dry, moderates hot spots under lights and reduces stagnant conditions that will create bacterial and fungal problems that only Ron McHatton can solve. That air movement also increases water demand, which is another example of the tent behaving like a system rather than a collection of independent gadgets.
One downside of my current setup is that bright LED lights and high air movement is that I need to water more regularly (every four days in summer typically). I do that either with a Petra HD4000 backpack sprayer or a garden hose. Some of my grow tent friends use misting systems, but I struggled to get even coverage, so I water manually.
I have been running my current setup for nearly two years and have had zero problems with rot and fungal infections (with the exception of one C. dowiana that went from happy to having a rotten rhizome in a matter of days). That is a tradeoff I am willing to make.
HEATING IS EASY; COOLING IS MUCH MORE DIFFICULT LEDs are efficient, but they still produce heat. Measure the temperature with the tent closed and the lights running before deciding you need additional heating. In my conditions, adding a few degrees with seedling heat mats is relatively easy in winter. However, dropping the temperature several degrees in summer is much harder. Although evaporative cooling from clay pots helps a little, on the hottest days here in DC, my tent does not drop below 77 or 78 F (25–25.6 C) at night. That is stressful for some of my cattleyas, so for next summer I will likely install a small air conditioning unit in my garage. This will ensure the plants get the 10–15 F (5.6–8.3 C) night temperature drop that they need to thrive.
SMART ENOUGH IS FINE I enjoy technology, so smart plugs and power strips from Kasa (managed through the Kasa app) add to the fun for me. My lights turn on and off automatically, and the VIVOSUN app and controller let me see conditions without repeatedly opening the tent. That visibility is useful.
Not every variable needs an app, alarm or colorful dashboard. My fans run continuously, so they do not need elaborate programming. I automate the repetitive tasks that benefit from consistency and leave myself responsible for looking at the plants. Use technology if it makes growing easier. If it makes you feel like the night manager of a nuclear power station, a simple timer is fine.
BUILD A SYSTEM YOU WILL ACTUALLY MAINTAIN A successful grow tent does not have to be expensive or complicated. It needs a safe electrical setup, reliable drainage, sufficient and reasonably even light, gentle air movement and enough access for you to inspect and water the plants. It also needs room for the plants to grow — advice I continue to ignore personally.
Start small. Test for leaks. Measure conditions. Add a few plants and watch how they respond before filling every available inch. The best setup is not the one with the most equipment. It is the one you can operate safely and consistently while still enjoying your orchids.
In the next article, I will move from hardware to horticulture: watering, feeding, seasonal light, pests and the other daily decisions that determine growing success.
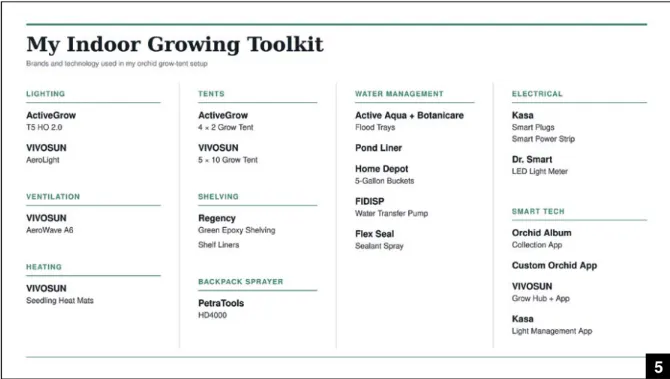
[5] Here are the key pieces of equipment that I rely on to keep my orchids thriving.
— Cam Mackey is an AOS Trustee and Chair of the Membership & Marketing Committee. He grows Cattleya species and primary hybrids in indoor grow tents. He lives in Washington, D.C., with his wife, two daughters, two cats, a Labrador retriever, and more orchids than any reasonable household needs (cam@aos.org).